Friday, May 27, 2016

Soy Milk 豆漿


I grew up drinking soy milk 豆漿 [Mandarin: dou jiang]. In Taiwan, it was often a part of my breakfast instead of regular milk. In fact, I hated the taste of cow's milk when I was a kid. And while cow's milk eventually grew on me, I still choose soy milk over cow's milk if given a choice.

During my childhood, Taiwanese breakfast stalls sold soy milk in plastic bags. Today, soy milk is more often sold in plastic or paper cups. It can be either sweet, salty, or unflavored. Sweet and unflavored soy milk are consumed more like a drink. Salty soy milk is usually flavored with dried shrimp, daikon, and scallions, and is more savory than salty. Into both types of soy milk, you can dip unflavored fried dough sticks called 油條 [you tiao] (or 油炸粿 in Taiwanese [iu chia kue]).

Youtiao dipped in soy milk

When my family moved to the U.S. about 20 years ago, we would buy soy milk from the Chinese grocery store. It was not yet common in regular grocery stores at that time. In the late 2000's, when soy milk finally could be found in every grocery store, I decided that perhaps it was time to try out the American version of soy milk. I bought a carton of SILK soy milk, poured it into a cup, took a sip -- and promptly spat it out. Missing from it was all the rich taste of the soy bean, and it tasted like artificial flavorings. I don't remember what I did with that carton, but I've avoided buying soy milk from the grocery store from then on.

A few years later, it finally dawned on me that I can make my own soy milk. After some research and experimenting, here is my recipe for authentic Chinese/Taiwanese sweet soy milk.

You will need: 1 cup soy beans (non-GMO, organic), 6-8 cups water plus more for soaking, and sugar (optional).

Place the soy beans into a large bowl. Cover the beans with water and soak overnight. Then drain the water. Here's what the beans look like before and after soaking.
Before soaking 

After soaking

Next, put half of the beans and 3-4 cups of water in a blender.

Blend for about a minute.

Pour the mixture into a large pot. And repeat for the other half.

Heat the soy mixture over medium heat for about 30-45 minutes, stirring constantly. Stirring is essential here: you don't want the mixture to burn or stick to the bottom of the pot. (Note: Sticking is almost inevitable when making soy milk. Stirring just minimizes it.)

Place a strainer over a large bowl and line it with a piece of cheesecloth. (I'm using a nut milk bag here.) Pour the heated mixture through the lined strainer or bag so the soy milk collects in the bowl.

When most of the liquid has drained out and has cooled down enough to handle, squeeze as much of the liquid out of the soy puree into the bowl.

If desired, add sugar to the milk. I opted not to for this batch.

Store the finished soy milk in a sealed glass container in the refrigerator. It should keep up to a week.


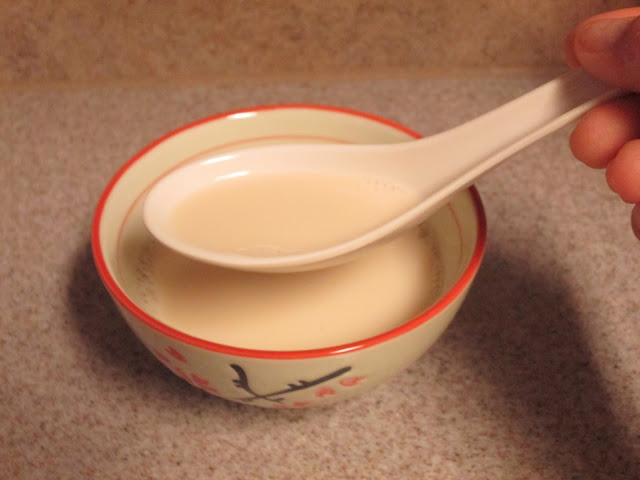
This homemade soy milk is rich in taste and nutrients. It can be served hot or cold. And best of all, it does not contain any artificial flavoring or preservative. Enjoy!
Saturday, January 16, 2016

Beef Noodle Soup 牛肉麵


It's been a few months since my last post, and we're now in the middle of winter. With the mild winter this year, I thought I wouldn't get to cook the soups I usually make during the winter months. But the temperature finally dropped enough for me to crave hot soup.

Beef noodle soup 牛肉麵 [Mandarin: niu rou mian / Taiwanese: gu ba mi] was arguably my favorite food growing up, and, as such, it has a special place in my heart. I've tried making this without vegetables and with vegetables, and I've found I like the version with vegetables more. The addition of vegetables when making the broth imparts a naturally sweet flavor. I'm using an onion and tomato in this recipe. I think daikon would give very nice flavor to the soup as well.

You will need: 3-4 lb beef chuck roast, 3 Tbsp cooking oil, 8-10 cloves garlic, 6 slices ginger, 1 medium onion, 1 large tomato, 6 Tbsp chili bean sauce, 1/2 cup soy sauce, 1/2 cup rice wine, 3 star anise, water, Chinese noodles (can be substituted with fettuccine), and bok choy.

Chili bean sauce 辣豆瓣醬 [Mandarin: la dou ban jiang] is a spicy paste made from fermented soybeans. There is also a non-spicy version that does not include chili if you don't like spicy food. Beef noodle soup is traditionally spicy, but you are certainly welcome to customize your soup to fit your taste. You can find both versions of the bean sauce in an Asian market. I prefer the brand (pictured below) with the blue lid that is made in Taiwan. Lee Kum Kee is another brand that I would trust.

First, bring a large pot of water to a boil. Then lower the beef into the boiling water. The goal is not to cook the meat. What we're doing at this stage is getting rid of some of the yucky protein residue that comes from cooking meat in a soup.


Let the meat cook for about 3-4 minutes, just so the outside is white. Fish the meat out and rinse in cold water to stop the cooking process. Discard the water.

Cut the beef into cubes. Set aside.

Heat up the cooking oil in a hot wok. Once the oil is hot, throw in the ginger slices and peeled garlic cloves. Stir fry until fragrant.

Then chop the onion into large chunks and throw the chunks into the wok. Stir it around.

Put the bean sauce into the wok. Stir fry for about 3 minutes.

Now, cut the tomato into 8 wedges and throw the wedges in. Stir it around.

Now, add the beef chunks.

Stir fry until the beef chunks turn mostly white.

Transfer the mixture from the wok to a large pot. Add the soy sauce, rice wine, and star anise. Cover the meat with water.

Bring the soup to a boil. Then turn down the heat and cover with a lid. Allow the soup to simmer for about 5-6 hours (or longer if you like).

Here's what my soup looks like after 6 hours of simmering. The garlic, onion and tomato chunks should now be super soft and almost disintegrated. The beef should be tender but not falling apart. The soup is condensed and very flavorful by this point. If you like, you can filter out the ginger, garlic, onion, tomato, and star anise. I personally don't mind them staying in the soup.

Now, we assemble the bowl. First, boil up some noodles and put the cooked noodles in a large bowl.

Chop up some bok choy and boil them in the same water you cooked the noodles in. Fish them out and top your noodles with them. Then ladle some of the noodle cooking liquid into the bowl too.

Now, ladle some of the beef soup into the bowl. Make sure you top off with lots of the tender beef. Garnish with some chopped green onions if you so choose. Another popular and traditional topping is Chinese sauerkraut 酸菜 [Mandarin: suan cai]. I chose not to top mine off with anything because I was hungry.

Enjoy!

Tuesday, August 18, 2015

Taiwanese Cucumber Salad 涼拌小黃瓜


It's been super hot in Texas! I've been keeping myself in air conditioned rooms and drinking lots of iced water and trying everything I can to not turn on the stove. This simple dish is just perfect because it involves absolutely no heating of food.

涼拌 (Mandarin: liang ban) literally means "chilled and dressed (in a dressing)," so basically any dish that is referred to as "涼拌" is a salad. This dish often appears as a small starter dish on a Taiwanese banquet table to help whet the banquet guests' appetite. My grandmother used to make it for us when she visited in the summer. It is light and crisp and refreshing during the dog days of summer.

Since this is a cucumber salad, the type of cucumber you use will make or break this dish. In Taiwan, of course, they use Taiwanese cucumbers, which can sometimes be found in Chinese supermarkets. Taiwanese cucumbers are long and thin. They have a thinner skin and a crisper texture than the regular slicer cucumbers you see in the American grocery stores. Regular slicer cucumbers are not good substitutes. Their skin is too tough and thick. They're not sweet or crisp enough. And the seeds and tough skin make them taste bitter. English cucumbers or Persian cucumbers are both better substitutes. This time, I'm using Persian cucumbers, which I found at Trader Joe's.

You will need: 6 Persian cucumbers, 1 clove of garlic, 2 tsp sugar, 1/2 tsp salt, 1+1/2 Tbsp vinegar, and 1 Tbsp sesame oil.

Cut the ends off the cucumbers.

Then use the flat side of your knife's blade to smash the cucumbers until they break open. I like using my heavy duty Chinese cleaver for this. This is great for taking out any anger you may have.

All smashed up!

Cut the cucumbers into sections, about 1.5 inches long. If there are large clumps of seeds, discard them. (Persian cucumbers should be nearly seedless, but if they are too ripe, there may be seeds.)

Put the cucumber sections into a gallon-size Ziploc bag (or a large bowl).

Mince the garlic.

And throw the garlic into the Ziploc bag too.

Now, add the sugar and salt to the bag.

Zip the bag close. And shake vigorously. (Toss well if you're using a bowl.) Chill in the refrigerator for at least 2 hours.

Add the vinegar and sesame oil. Close and shake again. Give it a taste and adjust seasoning. Refrigerate for another 30 minutes.

And you're done! Drain and serve.

It is best to eat all of this dish on the same day that it is prepared. If you must store leftovers, make sure to drain the liquid first. Then cover and refrigerate. Finish within three days.

Tuesday, August 11, 2015

Curry Rice 咖哩飯


Curry rice is one of my favorite dishes to cook and eat. It is super simple and easy to make and awesomely delicious and nutritious. Moms love this dish because they can pack a lot of vegetables and protein into one dish. In fact, this was one of the ways my mom tricked me into eating carrots when I was little.

Technically, curry rice is a Japanese dish (well, actually imported to Japan from India by the British -- so not exactly Japanese in origin). It is one of the remnants of the 50-year Japanese colonial rule in Taiwan (1895-1945) and very much beloved by the Taiwanese people. There are multiple Japanese curry restaurants in Taiwan, and they're always packed.

In the U.S., Japanese curry is now much more accessible to home cooks than even just five years ago. I used to have to go to the Asian market to buy pre-packaged Japanese instant curry blocks. Imagine my delight and surprise when I found out that my local Walmart carries them. There are various brands out there: Vermont Curry, Golden Curry, Kokumaro Curry. No matter what brand, they always come in three different spiciness levels -- mild, medium, or hot. Since these are catering to the Japanese palette, all three spiciness levels are generally pretty tame. Pictured below is the brand that Walmart carries and the one I'm using for this blog post, S&B Golden Curry.


My personal favorite brand actually is House Foods Vermont Curry, which has a "touch of apple and honey." It packs a full punch of flavor while being sweet and delicate. Also, in my opinion, it's not as oily as Golden Curry. I would usually pick up a few boxes when I go to the Asian market, but I haven't been in a while. And I just found that you can actually order it from Amazon, so I guess that's coming in my next Amazon order.
Now, let's get cooking.

You will need: 3 medium carrots, 3 medium russet potatoes, 1 10-oz package of mushrooms, 1 medium onion, 3 boneless skinless chicken thighs, salt, black pepper (not pictured), corn starch (not pictured), olive oil (not pictured), 2 boxes of curry mix (3.5 oz) (Only one box is in the picture. I decided to add another box when I realized that one box was not enough for the amount of food and liquid I had in the pot.), and water.

Really, you can add whatever vegetables you want. I've seen people add celery, broccoli, and bell peppers to their curry. Apples work well too. Traditionally, the Japanese always have carrots and potatoes in their curry, but you can certainly take them out if you don't like them. My aunt used to cook a dish that was just cauliflower in curry sauce when we were little, and we would slurp it right up. If chicken is not your favorite protein, then use beef or pork or lamb. You're vegetarian? Then don't add meat. Seriously, this is a very customizable dish.

Caution: I was making a large portion for me and my two brothers, who are in their twenties and can
eat a lot. Plus I like to make a lot so I can pack it for lunch and still have leftovers for the next night. If this is too much for you, just cut the recipe in half.

First, we're going to prep the vegetables. Wash and peel the carrots. Then chop them into 1-inch sections.

Wash and peel the potatoes. And chop them into 1-inch cubes.

Wash the dirt off the mushrooms and slice them. (I bought the pre-sliced ones this time because they were on sale. Most of the time, I buy whole mushrooms.)

Slice the onion.

Next, we'll prep the chicken. Cut the chicken into 1-inch pieces and put the meat into a bowl.

Season the chicken pieces with some salt and black pepper. Mix it up so all of the chicken pieces are coated with the seasoning.

Add some cornstarch.

Mix it up. Then set the chicken aside. Usually, I would cover the bowl with saran wrap and refrigerate it until I need it.

All of the prep work is now done. Get a big pot and heat up some olive oil over medium-high heat.

When the oil is heated, throw in the onion slices. Saute for a minute or so.

Then throw in the carrots. Saute for another minute.

Then throw in the mushroom slices and a pinch of salt.

Saute the vegetables until they start to soften.

Then in go the potato cubes.

Stir the veggies and potatoes a little. Then add water, just enough to cover the vegetables. I think I added too much water this time. Trust me, you would rather err on the side of adding too little water. You can always add more water later if it's not enough. If you add too much water, then your curry can end up too watery and not flavorful enough.

Cover the pot with a lid. Bring the liquid to a boil.

Now, we open the curry mix.

Notice the bottom of the packaging divides the entire block into sections.

Use these guiding lines to break up the block into sections.

Here's my pot of boiling liquid. The potatoes should be soft by now. But make sure to test it with a fork or chopstick.

Gently place the curry blocks into the liquid, one section at a time. Stir after the addition of each block. The liquid will start to change color and thicken as the blocks dissolve.

While the liquid is still boiling, take the chicken out of the refrigerator. Gently drop a few pieces of the chicken into the pot at a time. Stir after each addition.

Once all of the chicken has been added, bring the mixture back to a boil then turn the heat down to medium-low. Let the curry stew continue to simmer for about 10-15 minutes. Stir occasionally to prevent the bottom from burning. Then you're ready to eat!

Put some freshly steamed rice into a dish. Then ladle the finished curry over the rice. Make sure you get a good amount of vegetables and meat.